Flir Lepton 3.5
Flir Lepton 3.5 + Raspberry Pi 3でサーモグラフィー
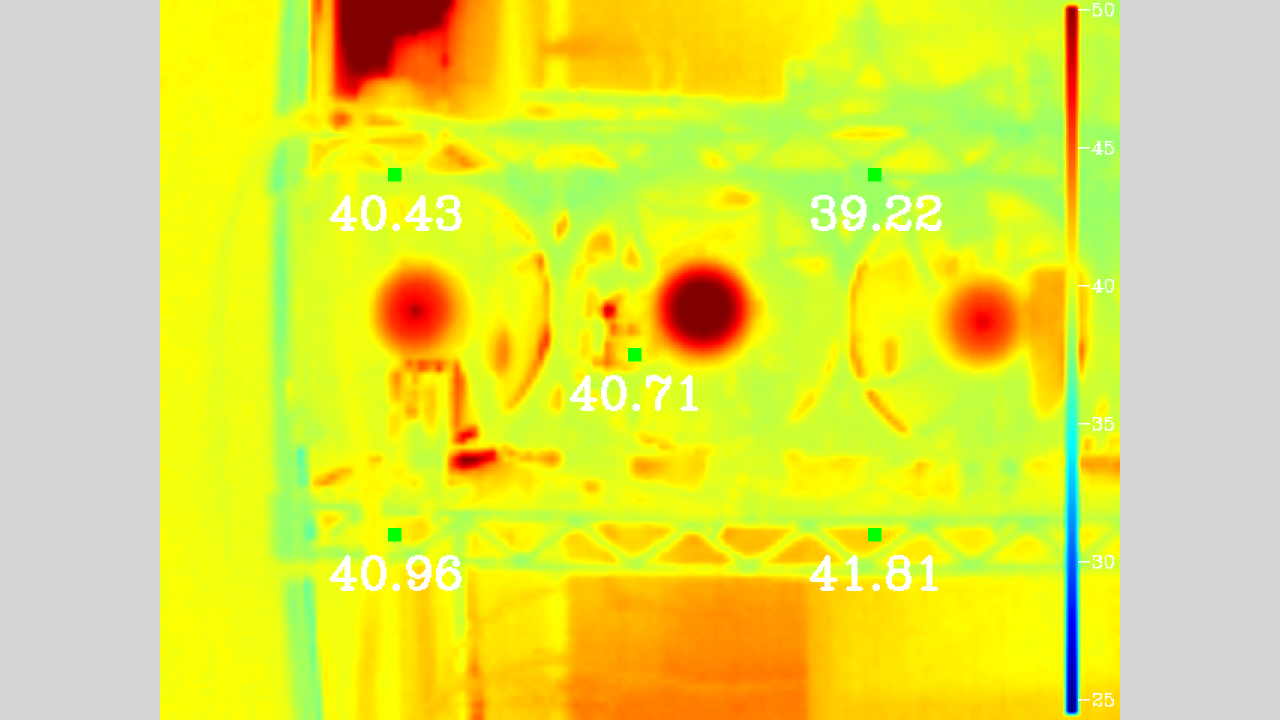
出来上がり
注意点①
この記事で取り扱っているのは
Flir Lepton 3.5
です。
3.5のピクセル数は 160 x 120 になります。(3.0も同様です)
それに対し、Flir Lepton 2.5 は 80 x 60 になります。
その場合、以下に記載しているプログラムはサイズの違いによりそのままでは動きませんので、ご注意ください。
また、通常のカメラ(Raspberry Pi Camera Module V2)は 640 x 480 としています。こちらもお使いのカメラに合わせて適宜コードを修正してください。
(どこかのタイミングでソースコードをきれいにしようとは思っていますが時間がないので)
注意点②
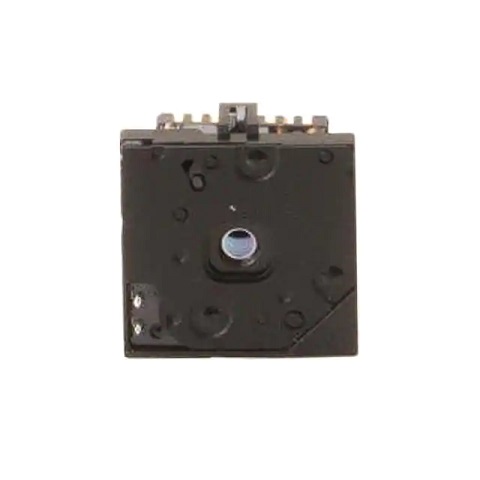
本サイトでは
Lepton Breakout Board v1.4
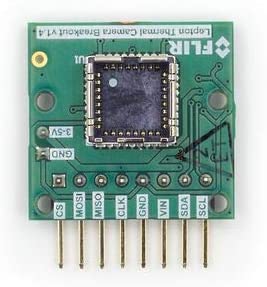
を用いていますが、
Flir社からは推奨されていない
とのことです。確かにちょっと動作不安定なところがあります。
推奨されている
PureThermal2
をできれば用いましょう。
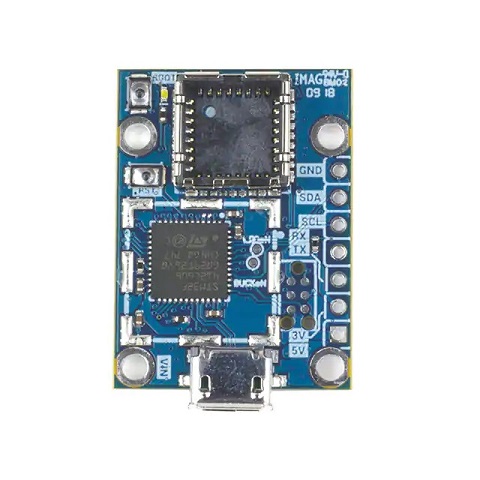
https://www.digikey.jp/product-detail/ja/groupgets-llc/PURETHERMAL-2/2077-PURETHERMAL-2-ND/9866290
ただし、PureThermal2とLepton Breakout Boardでは接続の仕方からプログラムから異なりますので本記事は参考になりません。
別のサイトをググりましょう。
(追記)
一応、PureThermal2 でのプログラムを書いてみたよ!
https://jitaku.work/it/product/flir/lepton35-purethermal2-opencv/
Breakout Board買っちった(ノω・)テヘ
という人は続きを。
準備物
- Raspberry Pi 3 Model B
- Flir Lepton 3.5
- FLIR Lepton Breakout Board v1.4
- メス-メス ジャンパワイヤ
- Raspberry Pi Camera Module V2
配線
以下の通り配線する
CS -> Pin 24, CE0 or Pin 26, CE1
MOSI -> Pin 19, MOSI
MISO -> Pin 21, MISO
CLK -> Pin 23, CLK
GND -> Pin 25, GND
VIN -> Pin 1, 3V3
SDA -> Pin 3, SDA
SCL -> Pin 5, SCL
Raspberry Pi準備
1. NOOBS等でRaspbianをインストール
2. CameraとSSHとSPIとI2Cを有効にする
1 2 | |
3. パッケージを最新にする
1 2 | |
4. swap領域増加
1 2 3 4 5 6 7 | |
5. おまじない
1 2 3 4 | |
6. pythonとpython-opencvを入れる
1 2 | |
7. OpenCVを入れる(すごい時間掛かる)
まず、makeやcmake、libgtk2.0-devなど必要なパッケージを入れる。
1 | |
OpenCVをダウンロードしてインストールする。
1 2 3 4 5 6 7 8 9 10 11 | |
pylepton
pyleptonは有志が作ってくれたFlir Lepton用のライブラリです。MIT Licenseなので商用利用でも問題ありません。
1. pyleptonを入れる
branchはlepton3-devを用いること
1 2 3 4 | |
2. サンプルコードを試してみる
1 | |
もしくは、
1 | |
・・・ノイズだらけ。
pylepton_overlayのwhileループの中にsleepを入れたらややノイズが落ち着いた。
サーモグラフィーを作成する
Flir Lepton 3.5を用いてサーモグラフィーを作成する。
名前はmylepton.pyとする。
1. mylepton.pyの作成
1 | |
# -*- coding: utf-8 -*-

import os
import cv2
import io
import numpy as np
import picamera
import time
import traceback
from pylepton.Lepton3 import Lepton3

def setColorBar(lepton_buf, _low, _high):

    d = (_high - _low) / 120.0
    i = 0
    for i in range(120):
        if i == 0:
            continue
        if i == 119:
            break
        _d = d * i
        lepton_buf[i][152] = _high - int(_d)
        lepton_buf[i][151] = _high - int(_d)
        #print("%d,%d" % (i,lepton_buf[i][152]))

def main(alpha = 0.5, device = "/dev/spidev0.0", high = 70, low = 10):

    alpha = float(alpha)
    high  = int(high)
    low   = int(low)

    if high < low:
        exit

    _high = int(high) * 100 + 27315
    _low  = int(low)  * 100 + 27315

    stream = io.BytesIO()

    cv2.namedWindow('image', cv2.WND_PROP_FULLSCREEN)
    cv2.setWindowProperty('image', cv2.WND_PROP_FULLSCREEN, cv2.WINDOW_FULLSCREEN)

    lepton_buf = np.zeros((120, 160, 1), dtype=np.uint16)

    with picamera.PiCamera() as camera:
        camera.resolution = (640, 480)
        camera.framerate  = 10
        try:
            with Lepton3(device) as l:
                last_nr = 0

                while True:
                    lepton_buf, nr = l.capture()
                    if nr == last_nr:
                        k = cv2.waitKey(1)
                        if k==27:
                            break
                        continue

                    stream.seek(0)
                    camera.capture(stream, format='jpeg')
                    data = np.fromstring(stream.getvalue(), dtype=np.uint8)
                    image = cv2.imdecode(data, 1)
                    #im = image[38+18:38+18+384, 51+35:51+35+512]
                    #image = cv2.resize(im, (640, 480))

                    last_nr = nr

                    # error skip
                    data_1d = lepton_buf.ravel()
                    if np.min(data_1d) == 0:
                        k = cv2.waitKey(1)
                        if k==27:
                            break
                        continue

                    # backup for temperature
                    lepton_temp = np.copy(lepton_buf)

                    # for color bar
                    lepton_buf = np.clip(lepton_buf, _low, _high)
                    setColorBar(lepton_buf, _low, _high)

                    cv2.normalize(lepton_buf, lepton_buf, 0, 65535, cv2.NORM_MINMAX)
                    np.right_shift(lepton_buf, 8, lepton_buf)

                    h, w, _ = image.shape
                    _image  = np.asarray(image, np.uint8)
                    _lepton = np.asarray(lepton_buf, np.uint8)
                    _lepton_gray = cv2.cvtColor(_lepton, cv2.COLOR_GRAY2RGB)
                    _lepton_gray = cv2.resize(_lepton_gray, (w, h))
                    _lepton_gray = cv2.applyColorMap(_lepton_gray, cv2.COLORMAP_JET)
                    res = cv2.addWeighted(_image, alpha, _lepton_gray, 1.0 - alpha, 0)

                    h = 2
                    w = 2
                    x1 = 160 / 4 * 1 - w
                    y1 = 120 / 4 * 1 - h
                    x2 = 160 / 4 * 3 - w
                    y2 = 120 / 4 * 1 - h
                    x3 = 160 / 4 * 2 - w
                    y3 = 120 / 4 * 2 - h
                    x4 = 160 / 4 * 1 - w
                    y4 = 120 / 4 * 3 - h
                    x5 = 160 / 4 * 3 - w
                    y5 = 120 / 4 * 3 - h

                    cv2.rectangle(res, (x1 * 4, y1 * 4), ((x1 + w) * 4, (y1 + h) * 4), (0, 255, 0), -1)
                    cv2.rectangle(res, (x2 * 4, y2 * 4), ((x2 + w) * 4, (y2 + h) * 4), (0, 255, 0), -1)
                    cv2.rectangle(res, (x3 * 4, y3 * 4), ((x3 + w) * 4, (y3 + h) * 4), (0, 255, 0), -1)
                    cv2.rectangle(res, (x4 * 4, y4 * 4), ((x4 + w) * 4, (y4 + h) * 4), (0, 255, 0), -1)
                    cv2.rectangle(res, (x5 * 4, y5 * 4), ((x5 + w) * 4, (y5 + h) * 4), (0, 255, 0), -1)

                    lepton_temp1 = lepton_temp[y1:y1+h, x1:x1+w]
                    lepton_temp2 = lepton_temp[y2:y2+h, x2:x2+w]
                    lepton_temp3 = lepton_temp[y3:y3+h, x3:x3+w]
                    lepton_temp4 = lepton_temp[y4:y4+h, x4:x4+w]
                    lepton_temp5 = lepton_temp[y5:y5+h, x5:x5+w]

                    tmp1 = (np.max(lepton_temp1.ravel()) - 27315) / 100.0
                    tmp2 = (np.max(lepton_temp2.ravel()) - 27315) / 100.0
                    tmp3 = (np.max(lepton_temp3.ravel()) - 27315) / 100.0
                    tmp4 = (np.max(lepton_temp4.ravel()) - 27315) / 100.0
                    tmp5 = (np.max(lepton_temp5.ravel()) - 27315) / 100.0

                    cv2.putText(res, str(tmp1), (x1 * 4 - 40, y1 * 4 + 40), cv2.FONT_HERSHEY_COMPLEX, 1.0, (255, 255, 255))
                    cv2.putText(res, str(tmp2), (x2 * 4 - 40, y2 * 4 + 40), cv2.FONT_HERSHEY_COMPLEX, 1.0, (255, 255, 255))
                    cv2.putText(res, str(tmp3), (x3 * 4 - 40, y3 * 4 + 40), cv2.FONT_HERSHEY_COMPLEX, 1.0, (255, 255, 255))
                    cv2.putText(res, str(tmp4), (x4 * 4 - 40, y4 * 4 + 40), cv2.FONT_HERSHEY_COMPLEX, 1.0, (255, 255, 255))
                    cv2.putText(res, str(tmp5), (x5 * 4 - 40, y5 * 4 + 40), cv2.FONT_HERSHEY_COMPLEX, 1.0, (255, 255, 255))

                    j = 10
                    d = (high - low) / 5.0
                    for i in range(6):
                        _d = d * i
                        _m = "-" + str(high - int(_d))
                        _n = j + (i * 92)
                        cv2.putText(res, _m, (610,  _n), cv2.FONT_HERSHEY_COMPLEX, 0.4, (255,255,255))

                    cv2.imshow('image', res)
                    k = cv2.waitKey(33)
                    if k==27:    # Esc key to stop
                        break
                    if k==ord('s'):
                        cmd = "scrot"
                        os.system(cmd)
        except Exception:
            traceback.print_exc()
        finally:
            camera.close()

if __name__ == '__main__':
    from optparse import OptionParser

    usage = "usage: %prog [options] output_file[.format]"
    parser = OptionParser(usage=usage)
    parser.add_option("-a", "--alpha",  dest="alpha",  default=0.5,              help="set lepton overlay opacity")
    parser.add_option("-d", "--device", dest="device", default="/dev/spidev0.0", help="specify the spi device node (might be /dev/spidev0.1 on a newer device)")
    parser.add_option("-H", "--high",   dest="high",   default=70,               help="highest value on display")
    parser.add_option("-L", "--low",    dest="low",    default=10,               help="lowest value on display")

    options = parser.parse_args()[0]

    main(alpha = options.alpha, device = options.device, high = options.high, low = options.low)
2. myleptonの実行
$ python mylepton.py -d "/dev/spidev0.1" -H 70 -L 10 -a 0.5
以上!